The Crypt of Home houses an ancient creature, Cerubin the Rejected, who has been resting in this chamber for ages. Recent archaeological expeditions here have found the methods by which they can gain access to his crypt, and in response he has awoken and mobilized his followers in his defense.
Location[]
The Crypt of Home is located in Broken Shores, northwest of The City of Home, at the Twin Altars on Dovve's Map or the Ancient Ruins on Nepentheia's map, and its coordinates are approximately 355, 2215. Note that, though the "official" limit on access is level 110, the Crypt does not teleport players of too high a level, as with ToTW. Therefore, a team of 111+ players can get into the dungeon with the help of a Beacon Warping Engineer.
Encounter List[]
- Dark Cenobite
- Type: level 70-80 humanoid
- Immunities: None
- Casts: Energy of the Follower, Follower's Darkness, and Degrading System
- Drops: Dark Pistol, Cloak of the Revoked, Anillo Casero de la Cripta, Collar Casero de la Cripta, and Floating Torch
- Dark Sanitary
- Type: level 70-80 humanoid
- Immunities: None
- Casts: Energy of the Follower, Follower's Darkness, and Degrading System
- Drops: Cloak of the Revoked, Anillo Casero de la Cripta, Collar Casero de la Cripta, and Floating Torch
- Dark Summoner
- Type: level 80-85 humanoid
- Immunities: charms (100%), calms (15%)
- Casts: Summon Skincrawler
- Drops: Dark Pistol, Cloak of the Revoked, Anillo Casero de la Cripta, Collar Casero de la Cripta, Sacrificial Ensigns of Cerubin and Floating Torch
- Cenobite Shadow
- Type: level 80-85 humanoid; invisible; must be targeted by area attacks
- Immunities: None
- Casts: Energy of the Follower, Follower's Darkness, and Degrading System
- Drops: Blackbird, Chiroptera, Howlet, and Panther, as well as the higher level versions
- Blorrg
- Type: level 80-85 gasbag
- Immunities: None
- Casts: None
- Drops: Gas Bladder and Bundle of Twisting Nerves
- Eclipser
- Type: level 75-80 mutant
- Immunities: fears (25%)
- Casts: Degrading System
- Drops: Cloak of the Revoked, Anillo Casero de la Cripta, Collar Casero de la Cripta, and Floating Torch
- Skincrawler
- Type: level 79-80 chimera
- Immunities: fears (25%)
- Casts: None
- Drops: Various Patches of Skincrawler Hide
- Abyss Serpent
- Type: level 79-80 snake
- Immunities: fears (80%), charms (35%), and calms (35%)
- Casts: None
- Drops: Nothing of note
- Necromancer
- Type: level 82 dragonclaw
- Immunities: None
- Casts: None
- Drops: Necromancer Cloak, Anillo Casero de la Cripta, Collar Casero de la Cripta, and Sacrificial Ensigns of Cerubin
- Kizzermole
- Type: level 79-80 parasite
- Immunities: fears (100%)
- Casts: None
- Drops: Kizzermole Tongue and Kizzermole Gumboil
- Awakened Pit Demon
- Type: level 100 snatcher
- Immunities: fears (100%), charms (70%), calms (40%), roots (30%), snares (20%)
- Casts: None
- Drops: Hood of Wicked Inspiration, Pit Demon Heart, and Pit Demon Spit
- Crypt Guardian
- Type: level 100 temple guard
- Immunities: immune to fears (100%), charms (75%), calms (75%), roots (30%), snares (20%)
- Casts: Unable to Move, Nano Distortion - Creation, Nano Distortion - Medical, and Nano Distortion - Self Control.
- Drops: Anillo Casero de la Cripta, Collar Casero de la Cripta
Bosses[]
Alpha Skincrawler[]
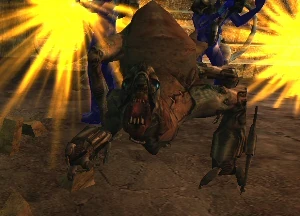
Alpha Skincrawler in Crypt of Home.
- Level 100 Chimera
| Attack Information
Speed:
Type:
Range: 2m | Immunities
| Special Attacks
| Loot
|
Bane[]
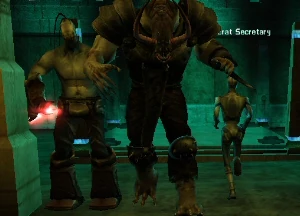
Bane in Crypt of Home.
- Level 80 Temple Guard
| Attack Information
Speed:
Type:
Range: 2m | Immunities
| Special Attacks
| Loot
|
Tentacles of Cerubin[]
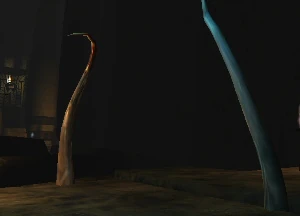
Tentacles of Cerubin in Crypt of Home.
- Level 120 Tentacle, 6 types (only 4 will appear)
- Types: Tentacle of Chill, Tentacle of Power, Tentacle of Cure, Tentacle of Shock, Tentacle of Burning Truth, Lazy Tentacle
| Attack Information
Speed:
Type:
Range: 10m | Immunities
| Special Attacks
| Loot
|
Cerubin the Rejected[]
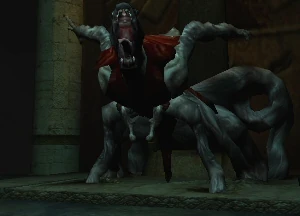
Cerubin the Rejected in Crypt of Home.
- Level 150 Unique
| Attack Information
Speed:
Type:
Range: 2m | Immunities
| Special Attacks
| Loot
|
Walkthrough[]
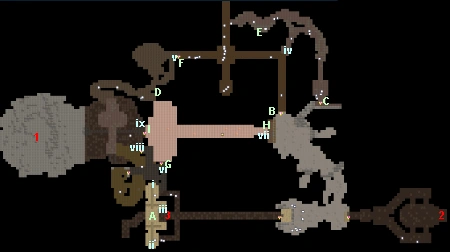
- The progress through the Crypt of Home is marked by several steps. First, when a team enters the Crypt, they need to clear the two side chambers of any Eclipsers, Dark Cenobites, and Dark Sanitaries that stand in their way. Then, two members, one at point i and one at point ii, must pull the switches at these points simultaneously to open the door to the Crypt. The players waiting by this door must run through immediately, as the door only remains open for 5 seconds.
- Once through the people on the other side of the door must pull the switch at iii to enable their teammates through. An Eclipser will appear to distract the teammates on in the main entryway, so make sure that you don't miss the door opening while fighting this Eclipser. Once the whole team is through, proceed down the ramp until the path branches in three ways. Left or right will bring you down to Bane, the first Guardian of the Crypt. Straight down the ramp will bring you to a venting room, a chamber full of Blorrgs.
- Defeat the Blorrgs, and continue to the lit area. Proceed straight through the doorway, and you will be able to confront a group of Skincrawlers and their leader, the Alpha Skincrawler, second Guardian of the Crypt. There is also a Cenobite Shadow that lurks this hallway, if you have a team member than can run an area effect nuke (or pet class, do /pet hunt). Once done with the Skincrawlers, proceed back to the main lit chamber, and move north through the archway.
- Here you will meet several Eclipsers and a Necromancer, who guards the exit from Cerubin's Antechamber. From this room, you have two options. Climb the waterfall at C to reach a room with a mysterious chest and a few Dark Summoners, or proceed through the dimly lit sewers beginning at B. The sewers will take you toward Cerubin, so eventually, you must go this way. When the team arrives at the four way junction, killing the Abyss Serpents there, proceed north to the Kizzermole passageway. Besides the many Kizzermoles here, there is also a Cenobite Shadow that lurks in this hallway, if you have a team member than can run an area effect nuke (or pet class, do /pet hunt). When you reach the second fork (the first is blocked off by debris), turn toward the switch at iv. Pull this switch to open the door at F.
- Run back toward F, stopping briefly to kill the Awakened Pit Demon if you wish (note that if you are after the pit demon, his spawn point moves to "D" from time to time). It is important that one team member makes it through the door at F, as there is a lag time before the switch at iv can be pulled, and another Pit Demon will appear if it is pulled again. Once a member is through F, the switch at v can be pulled at any time to allow more members through.
- From here, continue through the Crypt. You will be confronted by more of the same creatures you have already seen as you progress through. It will seem hard, because it is very easy to pull more than a few adds while moving through here, so be patient (or bring an area-nuking NT). There is also a Cenobite Shadow that lurks in this hallway. At the top of the ramp, you will see two doors. The first, in the upper left, leads to a small chamber with a switch (viii). The second has a switch right next to it (vi). All but one member of the team should use the switch at vi, and move through door G, leading into Cerubin's Antechamber. These team members should clear the area and gather in front of I.
- The remaining team member, behind door G, must wait until their teammates are positioned at I. Once the team is gathered there, the member who stayed behind must pull switch viii, opening the door to Cerubin's Crypt. The members at I should proceed through the doorway into the Crypt. The remaining teammate should then pull the switch at vi, move through G, and stand at I. Another teammate can then pull the switch at ix, open the Crypt from inside, and allow the last party member into the Crypt.
- Here you will find, for the first time, the Crypt Guardians, in addition to more Necromancers and Dark Summoners. Defeat all the adds, and pull the switch at viii to open the door to Cerubin's Crypt. Upon entering Cerubin's Crypt, you will see several Crypt Guardians, and Cerubin himself at the far end of the chamber. Proceed to kill the guardians, and down the bridge to Cerubin.
- Once at Cerubin, the battle could be very easy, or very hard, depending on which of his tentacles emerges from the ground to aid him. Each tentacle has its own strength and purpose, but the key one to watch out for is Cerubin's Tentacle of Cure, which can heal Cerubin for 1000-1500 points every few seconds. If the team does not take out this tentacle, the battle may be lost. If, however, the Tentacle of Cure does not spawn, the battle is much easier... but still make sure that several members focus on the tentacles to make the battle a straightforward showdown with Cerubin.
- Once Cerubin falls, the team can exit the dungeon by pulling the switch at vii, which opens the door once guarded by a Necromancer. Pulling this switch will call additional Necromancers to the scene. Once these are defeated, it is simply a matter of clearing the Eclipsers, Blorrgs, Cenobites, and Sanitaries again on your way out the door.
Loot[]
Weapons[]
- Jagged Claw
- Dark Pistol
- Blackbird
- Chiroptera
- Howlet
- Panther
- Kizzermole Gumboil
Armor[]
- Cloak of the Revoked
- Human Skin Hood
- Anillo Casero de la Cripta
- Collar Casero de la Cripta
- Bracer of Dark Flame
- Hood of Wicked Inspiration
- Kizzermole Tongue
- Sacrificial Ensigns of Cerubin
- SpiritTech Circlet of Cerubin
- Gamboling Master's Wear
- Shapeshifter's Vest
- Bracer of Recondite Flames
- Intimate Tentacle Things
- Tentacle Tape
- Tentacle Threads
- Tentacle Thongs
- Neck Eye
- Grasping Ring
- Brother's Brass Knuckles
Miscellaneous[]
- Focus Funneling Device
- Damaged Proliferation Unit
- Gas Bladder
- Bundle of Twisting Nerves
- Floating Torch
- Pit Demon Heart
- Pit Demon Spit
- Various Patches of Skincrawler Hide
Credits[]
The base of this guide was originally written by Baryonyx for use on Faunlore, and is used here with permission.